Case import workflow configuration screen
This topic provides an overview of the Case import workflow configuration screen and all the settings and buttons on it.
NOTE: This screen is only applicable if your account supports either a specific format of workflow automation for creating email cases or if you are using the OSS-SRN Express Portal to create cases. If you have requirements for using workflow automation in your organization, contact support at Gladiator Forensics.
NOTE: Typically only administrators have access to this screen.
The Case import workflow configuration screen is used for the workflow automation that automatically creates cases from either emails or the OSS-SRN Express Portal. It allows you to configure OSS-ESPA so that a person can either email case files or submit them using the OSS-SRN Express Portal. OSS-ESPA automatically generates a case and a report which it distributes to the people you select.
This screen allows you to define the details of the mailbox credentials used by the workflow, how the cases are named, and the type of reports generated. The case name is generated automatically using a prefix you define and OSS-ESPA then appends a timestamp. OSS-ESPA only processes Active workflows. If an email has no attachments then no case is created.
This screen also allows you to define settings associated with the workflow's IQ packet reports, such as how the sectors are displayed in your IQ packets and previews. For the workflows, these settings override the same settings that are available on the IQ packet settings and Admin IQ packet settings screens.
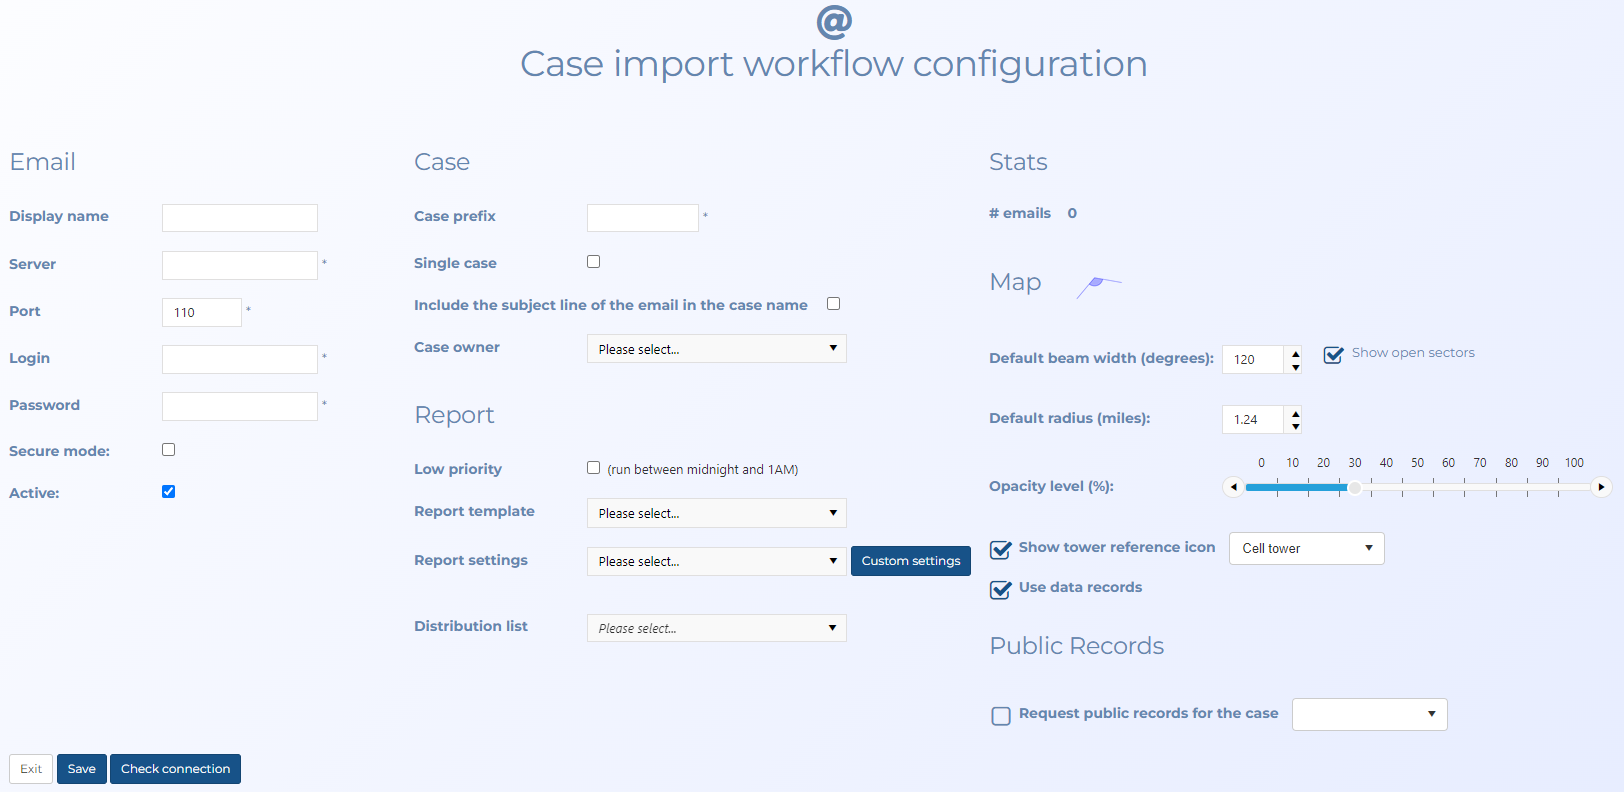
Enter the mailbox credentials you want used by your workflow. This email is then used by OSS-ESPA to ingest the data and files to create a new case.
Enter a name for your case workflow. This allows you to identify it on the Case import workflow screen.
Enter the URL of the email server that you want to use for your workflows, for example: email.espa-test.com.
Enter the port of the email server that you want to use for your workflows.
Enter a valid login for the email server that you want to use for your workflows.
Enter a valid password for the email server that you want to use for your workflows.
Select if your email requires secure mode.
Select to set OSS-ESPA to monitor the email address that you submit your cases to. If this is not selected then your case files will not be processed by OSS-ESPA. This setting is coupled with the Active setting on the Case import workflow screen.
Enter the prefix you want used for cases created by this workflow. OSS-ESPA automatically generates a case name using this prefix and appends a timestamp, for example, "MEX2 2021/11/12 16:28:26".
Select if you want all the received emails to be combined into the same case.
Select if you want to include the email's subject line in the case name. That means the case name includes the Case prefix, email subject then the timestamp.
Select the person that you want to be the case owner for cases generated by this workflow.
To generate reports you must select both a report template and the report settings.
Select if reports generated by this workflow will be of low priority. This means the reports will generate between midnight and 1 AM, leaving OSS-ESPA to generate critical reports more quickly. If this is not selected then the reports will run immediately OSS-ESPA receives the email.
Select one of the predefined report templates.
Select from the menu the available report configurations.
Click if you want to review which topics are included in the IQ packet you selected in Report settings, or if you want to edit it. The Custom IQ packet report settings and Admin custom IQ packet report settings screens opens.
Select which region you want the report emailed to.
A link to the report is then emailed to all the personnel who are selected as belonging to that region. The regions are defined on the Manage regions screen and the agents are assigned to the region using the Add/Edit user screen.
This is only displayed if you opened the screen via a pre-exisitng email workflow.
This displays the number of emails containing attachments that OSS-ESPA has received for this email workflow.
Select the sector beam width you want used as the default each time a case is opened on the ESPA analysis center. The default value is 120 degrees.
Select if you want to display the sectors as open sectors where they are only 20% partially filled. You may want to do this so that you are not showing an exact theoretical cell boundary in your report. Showing an exact theoretical cell boundary could cause people to incorrectly believe that the cell coverage ends exactly where the displayed theoretical pie cell boundary ends.
Select the sector radius you want used as the default each time a case is opened on the ESPA analysis center. The default value is 1.24 miles.
Use the slider to change the transparency of the sectors displayed on the map. Reducing the transparency level is useful if you have multiple sectors overlapping each other as it makes it easier to read the underlying map layers and street names.
Select if you want a tower reference icon displayed. You can also select which type of icon you want used.
Select if you want data communications to be included in the analysis outputs along with voice and SMS communications.
Select if you want to request a public records check on the phone numbers in the case's CDR. The results are included in the IQ packet. If a subsequent IQ packet is requested OSS-ESPA does not request the public records again.
Public record files are generated from tools such as Thomson Reuters CLEAR files and Whooster, and allow you to do reverse phone number look-up. This allows you to correlate phone numbers from the CDRs with names and address of the owners of those numbers. The menu allows you to select which of these tools you want to use if your OSS-ESPA is configured for both.
Click to return to the Case import workflow screen without saving any changes.
Click to return to the Case import workflow screen saving any changes you made.
Click to test your email credentials. A message is displayed indicating whether or not the credentials you have entered were correctly validated with your email server.